Import PSDs directly, no Photoshop scripts needed

February 24th, 2024

We've just released Spine 4.2.10-beta where we've added the ability for the Spine editor to process PSDs directly. This is great for many reasons:

  • You are no longer forced to use Photoshop -- use any image editor that can save a PSD file.
  • All the tags from the PhotoshopToSpine script are supported.
  • It is much faster! On a large PSD (200MB, 215 layers) it finishes in about 25% of the time (6 seconds versus 23) compared to the PhotoshopToSpine script.
  • Process the PSD and import it into Spine in one step.

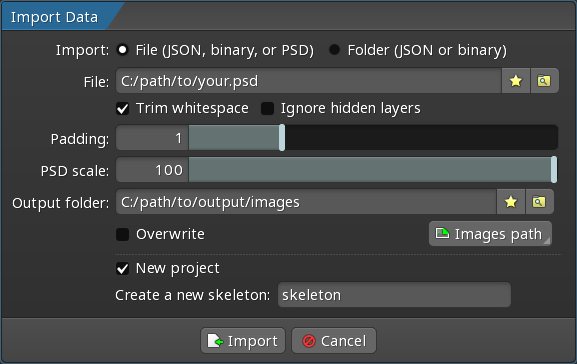
To try it out, go to Import Data and choose a PSD file:

There are other great things in the 4.2.10-beta changelog:

  • Constraint folders make it easier to use and organize many constraints, especially great for physics.
  • Draw order folders make it easier to organize your slots so you don't have one very long list to deal with.
  • Lots of important fixes and improvements.

Quick overview of the new Spine PSD Import and Slot and Constraints folders:

Jump over to the Spine forum to discuss this post!

New export shell scripts

February 15th, 2024

Streamline your Spine export process

Use our new shell scripts to export all your projects at once! The scripts search for .spine project files and export each project found. Each project can use different export settings by placing an export settings file next to the project file.

Using a script to export has many advantages:

  • Export any number of project files all at once.
  • Your exports always use the correct settings. No need to rely on animators to use the right settings each time.
  • Your software's build process can run the export scripts, ensuring every build always has the latest exports. Animators don't need to remember to perform exports after every change to the project files.
  • When updating to a newer Spine version, all your projects must be exported again. When you have export scripts setup, this is very easy!

Getting started

Here's a video showing how to use the scripts, or keep reading for textual step-by-step instructions.


Download the scripts

Download the script for your operating system:

You can find more information about the scripts on the spine-scripts GitHub repository.

Configure the script

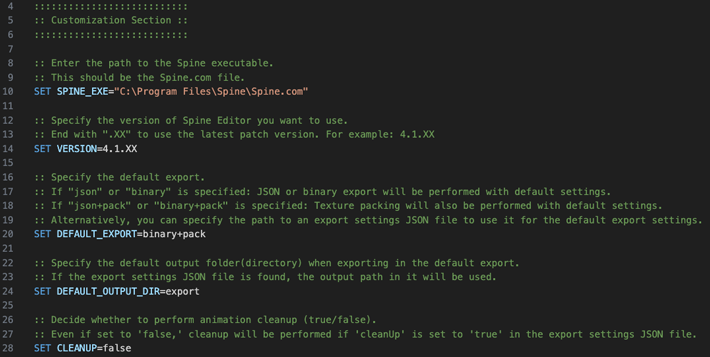
When you open the script with a text editor you'll find a Customization Section at the top. Here is an excerpt from spine-export.bat (spine-export.sh is very similar):

The first three settings should be reviewed before running the script:

  1. SPINE_EXE The path to the Spine executable file. If Spine cannot be found here, the script will look in other common installation locations.

  2. VERSION The version of the Spine editor that to use for performing the exports. Keeping your Spine editor and runtime versions that same is very important.

  3. DEFAULT_EXPORT The script looks for an export settings JSON file in the same folder as the Spine project. If that is not found, the export settings specified here are used. There are 4 shortcuts for common default settings: json, json+pack, binary, or binary+pack. Alternatively, you can specify a path to an export settings file (see below for more about that).

Running the script

Windows

On Windows there are a few ways to run the script:

  1. Drag and drop a folder on the spine-export.bat file.
  2. Double click the spine-export.bat file to open a CMD window, then type or paste a path, or drag and drop a folder onto the CMD window.
  3. Run the spine-export.bat file from a CMD prompt, then type or paste a path, or drag and drop a folder onto the CMD window.
  4. Run the spine-export.bat file from a CMD prompt with a path as the first parameter.
spine-export.bat path\to\spine\project\folder

The script searches the specified folder and all subfolders. If it finds a .spine file it performs an export.


macOS or Linux

On macOS or Linux, before running spine-export.sh you must first grant it the execute permission. Open Terminal, navigate to the directory where the script is located, then grant execute permission with this command:

chmod +x spine-export.sh

To run the script, specify ./spine-export.sh and the path to the directory containing the Spine projects you wish to export. For example:

./spine-export.sh /path/to/spine/projects/directory/

If you don't specify a path when executing the script, the script will prompt for a path to be entered.

The script searches the specified directory and all subdirectories. If it finds a .spine file it performs an export.


Export settings

To specify detailed export settings, you need to prepare an export settings JSON file.

Save export settings

The export dialog in the Spine editor has a Save button in the lower left corner that save the current export settings as a JSON file.

The saved export settings file will have the extension ".export.json".

If Pack was checked in the export settings then the texture packer settings are also saved in the .export.json file.


Default export settings

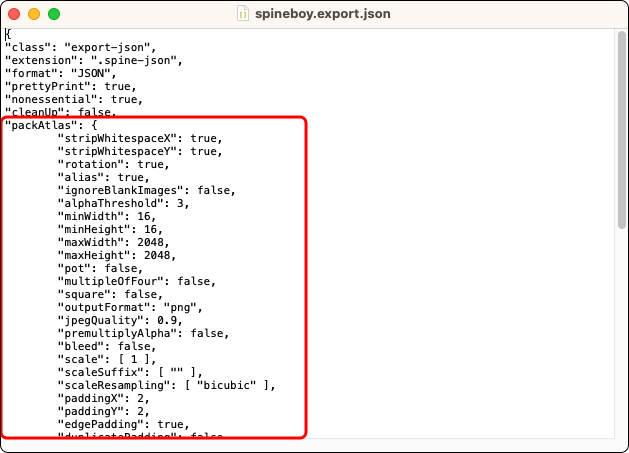
Open the script file with a text editor and change the value of DEFAULT_EXPORT to the path of your .export.json file. For example:

DEFAULT_EXPORT=/path/to/default.export.json

These settings will be used if no .export.json file is found next to a project file.

Note that the exported files will be output using DEFAULT_OUTPUT_DIR in the Customization Section, not the output path in the default .export.json file.

Export settings per project

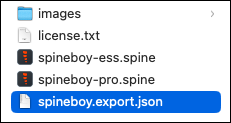
To export a Spine project with different settings, prepare an .export.json file with the settings and save it in the same folder as the Spine project. For example, the filesystem hierarchy could look like this:

<Folder where you specify the path when running the script>
      ├── 01
      │ ├── skeleton1.spine
      │ ├── skeleton1.export.json
      │ ├── images
      ├── 02
      │ ├── skeleton2.spine
      │ ├── skeleton2.export.json
      │ ├── images
      └── 03
         ├── skeleton3.spine
         ├── skeleton3.export.json
         └── images

The .export.json file name does not need to match the project file name.

Multiple exports for the same project

To export a project multiple times with different export settings, prepare and include that many .export.json files. For example, to export the skeleton data both in binary format and as a PNG sequence, your filesystem hierarchy could look like this:

<Folder where you specify the path when running the script>
      ├── 01
      │ ├── skeleton1.spine
      │ ├── skeleton1_Binary.export.json
      │ ├── skeleton1_PNG.export.json
      │ ├── images
      ├── 02
      │ ├── skeleton2.spine
      │ ├── skeleton2_Binary.export.json
      │ ├── skeleton2_PNG.export.json
      │ ├── images
      └── 03
         ├── skeleton3.spine
         ├── skeleton3_Binary.export.json
         ├── skeleton3_PNG.export.json
         └── images

Mixing default and custom settings

A project file without an .export.json file in the same folder will be exported with default settings:

<Folder where you specify the path when running the script>
      ├── 01
      │ ├── skeleton1.spine
      │ ├── skeleton1_Binary.export.json
      │ ├── skeleton1_PNG.export.json
      │ ├── images
      ├── 02
      │ ├── skeleton2.spine <This skeleton is exported with the default settings>
      │ ├── images
      └── 03
         ├── skeleton3.spine
         ├── skeleton3_Binary.export.json
         ├── skeleton3_PNG.export.json
         └── images

Modifying the scripts

You are welcome to write your own scripts using Spine's command line interface or modify our scripts to meet your needs. We have written comments in the script to describe everything it does and the README file goes into greater detail about how it works.


Have you found this tutorial helpful? We would love to hear your feedback in the Spine forum!

Muscle setup - Spine Tips #7

February 12th, 2024

We are happy to share a new Spine Tips tutorial video! This time we will make an FK arm setup with an IK constraint to mimic the muscle contraction. We will use a few tools and techniques that are the basis for any character setup in Spine. The result is a simple and fast setup that can add a subtle lifelike quality to our rigs, without complicating the animation process.

Try to follow along and create the skeleton yourself using the project files found in the video's description.

Whether you are new to Spine or looking to improve your skills, you should find some valuable tips here. Stop by the Spine forum and discuss your setups and different ways to automate your characters!

Have fun and happy animating!

New Twitch streams: Exploring physics in Spine

December 27th, 2023

Let's explore Spine's new physics constraints with Erika in a new season of Twitch streams!

Here's an overview of physics in the Spine 4.2 beta:

Here are 3 videos covering rigging a character for physics:

These videos are currently ongoing and feature Spineboy in a snow globe:

To watch live, follow the Esoteric Software Twitch channel to be notified of the start of a stream. Also and check the stream schedule.

If you can't make it for the stream, don't worry! We'll be uploading the recordings on our Twitch streams archive page.

Let us know your comments and opinions on the Spine forum.