spine-godot Runtime Documentation
Licensing
Please see the Spine Runtimes License before integrating the Spine Runtimes into your applications.
Getting Started
Installation
The spine-godot runtime comes in two flavors:
- spine-godot GDExtension: A single package you drop into your existing Godot project's
bin/folder. Supports all platforms Godot supports, possibly including consoles in the future powered by W4Games. Lacks support forAnimationPlayer, does not have dedicated C# bindings, and is missing a minor editor feature. - spine-godot custom C++ engine module: requires you to use a custom Godot Editor build and Godot templates. Unlikely to support consoles in the future. Supports additional features, like
AnimationPlayer, and dedicated C# bindings.
spine-godot GDExtension downloads
Download the spine-godot GDExtension version for the Godot version you are using. Unpack the .zip file and copy the bin/ folder to the root folder of your project. E.g. you should have a folder your-project/bin and a file your-project/bin/spine_godot_extension.gdextension. Then run the Godot editor.
spine-godot engine module downloads
Note: All editor builds require 64-bit support. The export templates for Windows, Linux and macOS also require 64-bit support. The export template for iOS devices only supports 64-bit ARM devices, which is a requirement by Apple.
Download the Godot editor for your operating system as well as the Godot export templates from the links above.
For Windows and Linux, unpack the .zip file and place the extracted executable file anywhere you like. For macOS, unpack the .zip file and place the Godot.app into your /Applications/ folder. If you have a pre-existing Godot installation, you can rename the Godot.app package.
To install the export templates .tpz file, open the Godot editor, then go to Editor > Manage export templates .... Click Install from file and select the .tzp you downloaded from the link above. You can now export your project for Windows, Linux, macOS, iOS, Android, and the web as usual. You can also use Godot's one-click deploy for Android and the web right from within the Godot editor.
Samples
The spine-godot runtime comes with many samples that demonstrate its feature set. To inspect and play around with the samples:
- Download either the GDExtension or the pre-built Godot editor from the links in the "Installation" section above.
- Clone the spine-runtimes Git repository. If you don't want to use Git, download the latest version as a ZIP and unpack it.
- Open the Godot editor and click
Import, then select the example folder based on your spine-godot and Godot Editor version:- GDExtension:
spine-runtimes/spine-godot/example-v4-extension/project.godot.- Unpack the GDExtension you downloaded and copy the
bin/to the project root before opening the project in the Godot editor!
- Unpack the GDExtension you downloaded and copy the
- C++ Engine Module:
- Godot 3.x:
spine-runtimes/spine-godot/example/project.godot. - Godot 4.x:
spine-runtimes/spine-godot/example-v4/project.godot. - Godot 4.x with C# support:
spine-runtimes/spine-godot/example-v4-csharp/project.godot.
- Godot 3.x:
- GDExtension:
The following examples are available:
01-helloworld: demonstrates how to use aSpineSpritenode to display and animate a Spine skeleton.02-animation-state-listener: demonstrates how to listen for animation state changes on aSpineSpritevia signals.03-mix-and-match. demonstrates how to create a custom skin composed from other skins for mix-and-match avatar creation scenarios.04-simple-input: demonstrates how to playback animations in reaction to input events.05-mouse-following: demonstrates how to manually let a bone in aSpineSpriteskeleton follow the mouse or touch events.06-bone-following: demonstrates how to use aSpineBoneNodeon aSpineSpriteto let a child node follow a bone in the skeleton.07-slot-node: demonstrates how to use aSpineSlotNodeto let a child node follow a slot in the skeleton, correctly inserting the child node in theSpineSprite's rendering order.08-animation-player: demonstrates how to use aSpineAnimationTracknode to create cut-scenes using Godot'sAnimationPlayeruser interface. Note: this example if not available in the GDExtension version of spine-godot09-custom-material: demonstrates how to apply custom materials to an entireSpineSpriteas well as individual slots via aSpineSlotNode.10-2d-lighting: demonstrates how to use normal maps in combination with aSpineSpriteto support Godot's 2D lighting system.11-bone-node: demonstrates usingSpineBoneNodeinstances to drive aSpineSprite's bones via Godot physics.12-physics: demonstrates Spine's physics using the Celestial Circus skeleton.13-load-from-disk: demonstrates how to load Spine .skel/.json and .atlas files from disk at runtime.
Compiling spine-godot from source
If you need to compile the spine-godot GDExtension, or spine-godot engine module (Godot editor, export templates) yourself, e.g. because you want to use a different Godot version, have other custom C++ modules, or want to work on the spine-godot runtime, we provide shell scripts to ease the process.
NOTE: Make sure you have all build dependencies installed before attempting this, as per the official instructions by Godot.
Compiling the GDExtension
To build the GDExtension binaries, clone the spine-runtimes repository. Run the following in a Bash shell (use Git Bash on Windows) from inside the directory you cloned the Spine Runtimes to:
./build/setup-extension.sh 4.4.1-stable false
./build/build-extension.sh <os> <arch>?
The setup-extension.sh build is responsible for cloning external dependencies and setting up the build. The first argument to setup-extension.sh is the Godot repository branch or commit hash you want to build the GDExtension against. The second argument specifies whether you want to compile a build with debug information. This can be useful for development purposes. The setup script will clone the appropriate version of godot-cpp and optionally the Godot editor repository, if a debug build should be created. It will also copy the spine-godot/spine_godot_extension.gdextension file to spine-godot/example-v4-extension/bin.
The build-extension.sh script is responsible for executing the build and generating the GDExtension binaries for a specific operating system. The <os> argument to build-extension.sh specifies the OS you want to build for. You can omit it if you want to build for your host OS and architecture. Valid values for <os> are windows, linux, macos, ios, android, and web. You can optionally pass the arch argument to build for a specific CPU architecture, e.g. x86_32, x86_64, arm64, etc, as per the Godot build system documentation. The GDExtension binaries will be placed in the spine-godot/example-v4-extension/bin folder in their respective operating system specific subfolder.
Building via GitHub Actions
The Spine Runtimes repository contains a GitHub workflows in .github/workflows/spine-godot-extension-v4.yml, and .github/workflows/spine-godot-extension-v4-all.ymlthat allow building the spine-godot GDExtension through GitHub actions. This may be simpler than compiling these artifacts locally. To use the GitHub workflow:
- Clone the Spine Runtimes repository
- Enable GitHub workflows on the cloned repository
- Manually trigger the
spine-godot-extension-v4-allworkflow.
The resulting binaries will be attached as artifacts to a successful workflow run.
Compiling C++ Engine Module
Godot 3.5.x
To build a Godot editor binary, clone the spine-runtimes repository. Run the following in a Bash shell (use Git Bash on Windows) from inside the directory you cloned the Spine Runtimes to:
./build/setup.sh 3.5.2-stable false
./build/build.sh release_debug
The first argument to setup.sh is the Godot repository branch or commit hash you want to build the Godot editor from. The second argument specifies whether you want to compile the editor for development. Valid values are true and false. If set to true, the build will add support for Live++ on Windows if you have set the LIVEPP environment variable to your Live++ installation directory, and disable many modules to speed up compilation.
The first argument to build.sh specifies the optimization level of the resulting binary. Supported values are debug, which allows full debugging but may be slow due to missing optimizations, and release_debug, which is generally used for release builds of the Godot editor.
The resulting Godot editor binary can then be found in spine-godot/godot/bin.
To build the export template for a specific platform, run the following in a Bash shell (use Git Bash on Windows):
./build/setup.sh 3.5.2-stable false
./build/build-templates.sh windows
The first argument to setup.sh is the Godot repository branch or commit hash you want to build the Godot editor from. The second argument must be false.
The first argument to built-templates.sh is the platform to compile the template for. Valid values are windows, linux, macos, web, android, and ios. Note that macOS and iOS export templates can only be build on a machine running macOS. See the official instructions by Godot.
The resulting Godot export template binary can then be found in spine-godot/godot/bin.
Godot 4.x
To build a Godot editor binary, clone the spine-runtimes repository. Run the following in a Bash shell (use Git Bash on Windows) from inside the directory you cloned the Spine Runtimes to:
./build/setup.sh 4.1-stable false
./build/build-v4.sh
The first argument to setup.sh is the Godot repository branch or commit hash you want to build the Godot editor from. The second argument specifies whether you want to compile the editor for development. Valid values are true and false. If set to true, the build will add support for Live++ on Windows if you have set the LIVEPP environment variable to your Live++ installation directory, and disable many modules to speed up compilation.
The resulting Godot editor binary can then be found in spine-godot/godot/bin.
To build the export template for a specific platform, run the following in a Bash shell (use Git Bash on Windows):
./build/setup.sh 4.1-stable false
./build/build-templates-v4.sh windows
The first argument to setup.sh is the Godot repository branch or commit hash you want to build the Godot editor from. The second argument must be false.
The first argument to built-templates-v4.sh is the platform to compile the template for. Valid values are windows, linux, macos, web, android, and ios. Note that macOS and iOS export templates can only be build on a machine running macOS. See the official instructions by Godot.
The resulting Godot export template binary can then be found in spine-godot/godot/bin.
Godot 4.x with C# support
Note: Godot 4.x with C# support currently only works on Windows, Linux, and macOS. As soon as upstream Godot releases support for mobile and the web, the spine-godot runtime will follow suit.
To build a Godot editor binary with C# support, clone the spine-runtimes repository. Ensure you have the additional requirements for C# installed, as per the Godot documentation Run the following in a Bash shell (use Git Bash on Windows) from inside the directory you cloned the Spine Runtimes to:
./build/setup.sh 4.1-stable false true
./build/build-v4.sh true
The first argument to setup.sh is the Godot repository branch or commit hash you want to build the Godot editor from. The second argument specifies whether you want to compile the editor for development. Valid values are true and false. If set to true, the build will add support for Live++ on Windows if you have set the LIVEPP environment variable to your Live++ installation directory, and disable many modules to speed up compilation. The third argument is optional and specifies whether to build with C# support. Valid values are true and false. In this case it is set to true to enable C# support.
The argument to build-v4.sh is optional and specifies whether to build wiht C# support. Valid values are true and false. In this case it is set to true to enable C# support.
The resulting Godot editor binary can then be found in spine-godot/godot/bin. Additionally, you will find a folder GodotSharp in the spine-godot/godot/bin directory. It contains all the C# binding assemblies for the Godot API, including the spine-godot runtime APIs. When creating a new project, you will need to wire these up via NuGet. Read the section "C# project setup" below for more information.
To build the export template for a specific platform, run the following in a Bash shell (use Git Bash on Windows):
./build/setup.sh 4.1-stable false
./build/build-templates-v4.sh windows
The first argument to setup.sh is the Godot repository branch or commit hash you want to build the Godot editor from. The second argument must be false.
The first argument to built-templates-v4.sh is the platform to compile the template for. Valid values are windows, linux, macos, web, android, and ios. Note that macOS and iOS export templates can only be build on a machine running macOS. See the official instructions by Godot.
The resulting Godot export template binary can then be found in spine-godot/godot/bin.
Building via GitHub Actions
The Spine Runtimes repository contains a GitHub workflows in .github/workflows/spine-godot.yml, .github/workflows/spine-godot-v4.yml, and .github/workflows/spine-godot-v4-all.ymlthat allow building all Godot editor and export template binaries through GitHub actions. This may be simpler than compiling these artifacts locally. To use the GitHub workflow:
- Clone the Spine Runtimes repository
- Enable GitHub workflows on the cloned repository
- Manually trigger the
spine-godot,spine-godot-v4, orspine-godot-v4-allworkflow.
The resulting binaries will be attached as artifacts to a successful workflow run.
C# Project Setup
Note: the spine-godot GDExtension currently does not come with C# bindings. The instructions below are for the spine-godot C++ engine module and corresponding custom Godot Editor build provided above.
If you use our Godot editor binaries with C# support, you have to take one extra step when setting up a new Godot project.
First, create the Godot project using the Godot Editor binary with C# support you downloaded from the installation section above.
Next, close Godot and open your project folder. In the root directory, create a new folder called godot-nuget.
Copy the Godot C# assemblies from the downloaded Godot editor ZIP file to that folder. These are the files you need to copy:
GodotSharpEditor.<version>.snupkgGodot.NET.Sdk.<version>.nupkgGodot.SourceGenerators.<version>.nupkgGodotSharp.<version>.nupkgGodotSharp.<version>.snupkgGodotSharpEditor.<version>.nupkg
The <version> depends on which Godot version you downloaded from this page, e.g. 4.1.1.
When you download and extract the Godot editor ZIP, you can find these files in the following folder:
- Windows:
godot-editor-windows-mono.zip\GodotSharp\Tools\ - Linux:
godot-editor-linux-mono.zip/GodotSharp/Tools/ - macOS:
Godot.app/Contents/Resources/GodotSharp/Tools, or alternatively right click the Godot.app file in Finder, selectShow Package Contents, then navigate toContents/Resources/GodotSharp/Tools/
Finally, create a new file called nuget.config in the root directory of your project with the following content:
<packageSources>
<!-- package source is additive -->
<add key="godot-nuget" value="./godot-nuget" />
</packageSources>
</configuration>
This configures the godot-nuget directory to be a package source for NuGet packages. Instead of fetching the official Godot C# assemblies from the NuGet package registry, the assemblies from the godot-nuget directory will be used, which also include the C# bindings for the spine-godot runtime.
You can now open your project in Godot again and use the Godot and spine-godot C# APIs instead of GDScript!
NOTE: if you have previously used the official Godot C# editor build, your NuGet cache will likely have the official Godot C# assemblies in NuGet cache at
$USER_HOME/.nuget. Sadly, NuGet will not replace those with the Spine enabled assemblies. Please clear your NuGet cache before building your Spine-enabled Godot C# project!
Please read the official Godot C# documentation for the details.
Updating the spine-godot Runtime
Before updating your project's spine-godot runtime, please consult our guide on Spine editor and runtime version management.
To update the spine-godot GDExtension, download the latest version from the Installation section above and copy it to your Godot project.
To update the spine-godot C++ engine module:
- Download the latest pre-built Godot editor binaries for the Spine Runtimes and Editor version you want to use from the
Installationsection above. - Download the latest pre-built Godot export template binaries for the Spine Runtimes and Editor version you want to use from the
Installationsection above. - Open the Godot editor and install the export templates by navigating to
Editor > Manage export templates .... ClickInstall from fileand select the.tzpyou downloaded. - If you are switching from one Spine major version to another, re-export your Spine projects with the Spine Editor version matching the Spine Runtimes version you just updated to, and replace your old exported files in your Godot project. Open your Godot project in Godot to trigger a re-import of the updated files.
- If you are using C# with Godot, copy the new assemblies from the
GodotSharpdirectory included in the editor download to your project'sgodot-nuget/directory as described above.
Using spine-godot
The spine-godot runtime supports loading, playback and manipulation of animations created with Spine. The spine-godot runtime is written in C++ and based on the generic spine-cpp runtime. The spine-godot runtime wraps the spine-cpp classes and functions and exposes them to GDScript and C#. In addition to exposing most of the spine-cpp API, the spine-godot runtime also provides Godot nodes to easily display and interact with Spine skeletons.
Please consult the Spine Runtimes Guide for a detailed overview of the Spine Runtime architecture.
Asset Management
Exporting for Godot
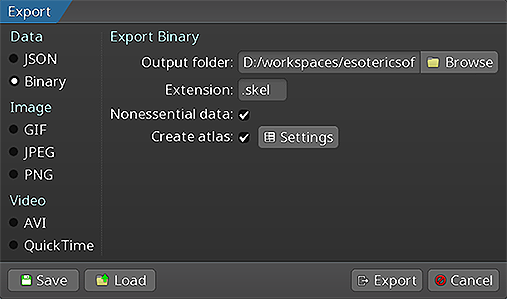 Please follow the instructions in the Spine User Guide on how to
An export of the skeleton data and texture atlas of your skeleton will yield the following files:
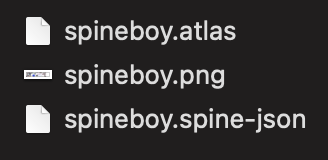
skeleton-name.spine-jsonorskeleton-name.skel, containing your skeleton and animation data.skeleton-name.atlas, containing information about the texture atlas.- One or more
.pngfiles, each representing on page of your texture atlas containing the packed images your skeleton uses.
Note: You should prefer binary skeleton exports over JSON exports, as they are smaller in size and faster to load. If you must use JSON, make sure the file extension is
.spine-jsoninstead of.json. If you have an existing project that still uses.jsonexport files, you can use this Python script to convert it to the new.spine-jsonextension.
The spine-godot runtime can import these files into special Godot resource types.
Note: The spine-godot runtime currently does not support atlases exported using pre-multiplied alpha due to technical limitations in Godot. Godot performs a bleed operation on non-premultiplied texture images by default. This is generally enough to avoid artifacts usually fixed by using pre-multiplied alpha.
Importing into Godot
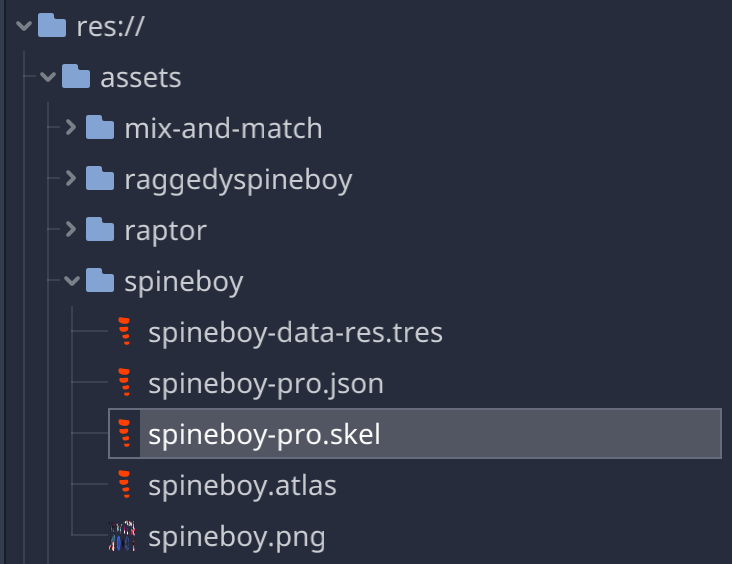
- Open your Godot project in the Godot editor.
- Drag your
.skel/.spine-json,.atlas, and.pngfiles into a folder of your choice
The asset importer will create a SpineSkeletonFileResource for the .skel or .spine-json skeleton file, a SpineAtlasAssetResource for the .atlas file, and a Godot texture resource for each .png file of the atlas.
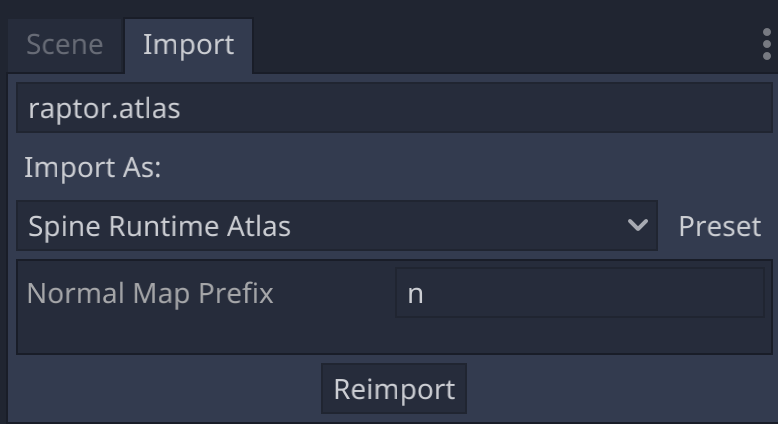
Note: In the import settings of a
SpineAtlasResourceyou can also specify the prefix for normal map images that should be used for each atlas page. By default, the prefix isn. Normal maps are required for 2D lighting support and are optional.
With the source files imported, you can now create a SpineSkeletonDataResource, which combines a SpineSkeletonFileResource and a SpineAtlasResource for use by a SpineSprite.
In the file system panel in the Godot editor, right click the folder you placed your Spine assets in, then select New Resource.... In the pop-up dialog, select SpineSkeletonDataResource, click Create, give the resource a name, and click Save.
Double-click the newly created resource so it shows up in the inspector panel. Assign the previously imported atlas resource and skeleton file resource of your skeleton. The skeleton data resource also stores animation mix times, which you can modify in the inspector.
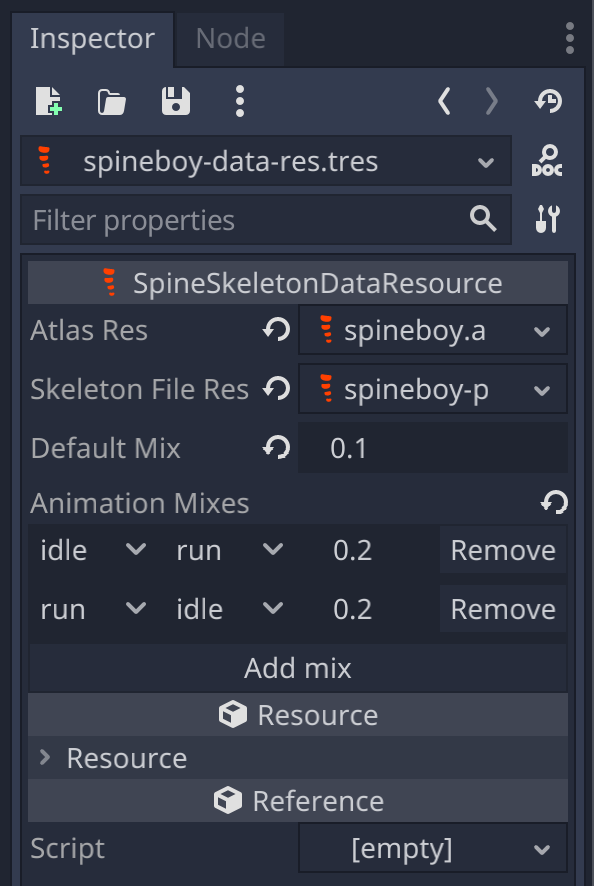
Note: A skeleton data resource for a specific skeleton file and atlas combination should be shared by all all instances of
SpineSpritethat should display this combination. Do not define skeleton data resources as inline resources in aSpineSprite, as that will duplicate the amount of data that is being loaded by your game.
Updating Spine Assets
During development, you may frequently update your Spine skeleton data and texture atlas files. You can simply overwrite these source files (.spine-json, .skel, .atlas, .png) by re-exporting from the Spine Editor and replacing the existing files in your Godot project.
The Godot editor will detect changes to these source files and re-import the assets accordingly, updating any other resources referencing these assets in the process. If the Godot editor fails to recognize the source file change, you can force a re-import in the import settings panel of the file in the Godot editor.
Nodes
The spine-godot runtime provides you with a set of nodes that allow to display, animate, and modify skeletons exported from Spine.
SpineSprite Node
![]()
The SpineSprite node displays the skeleton data and atlas stored in a SkeletonDataResource. The node exposes an animation state through which the skeleton can be animated. The SpineAnimationState can be accesssed via SpineSprite.get_animation_state(). The node also exposes the skeleton instance (SpineSkeleton) via SpineSprite.get_skeleton(), through which you can query all of a skeleton's properties, like bones, slots, attachments, skins, or constraints.
Creating a SpineSprite
To create a SpineSprite node, click the + button in the scene panel and select SpineSprite. Next, assign a SkeletonDataResource the SpineSprite node should display to the respective property in the inspector, as shown in the image above.
You can freely transform the SpineSprite node in the Godot editor viewport using the respective tools and keyboard shortcuts. The in-editor bounding box of the SpineSprite coincides with the bounding box the skeleton has in the Spine Editor in setup mode.
Inspecting bones, slots, and attachments
Once you have assigned a SkeletonDataResource to a SpineSprite, you can inspect the bones, slots, and attachments of the skeleton.
Select the SpineSprite in the editor viewport. In the Debug property section, check the skeleton components you want to inspect.
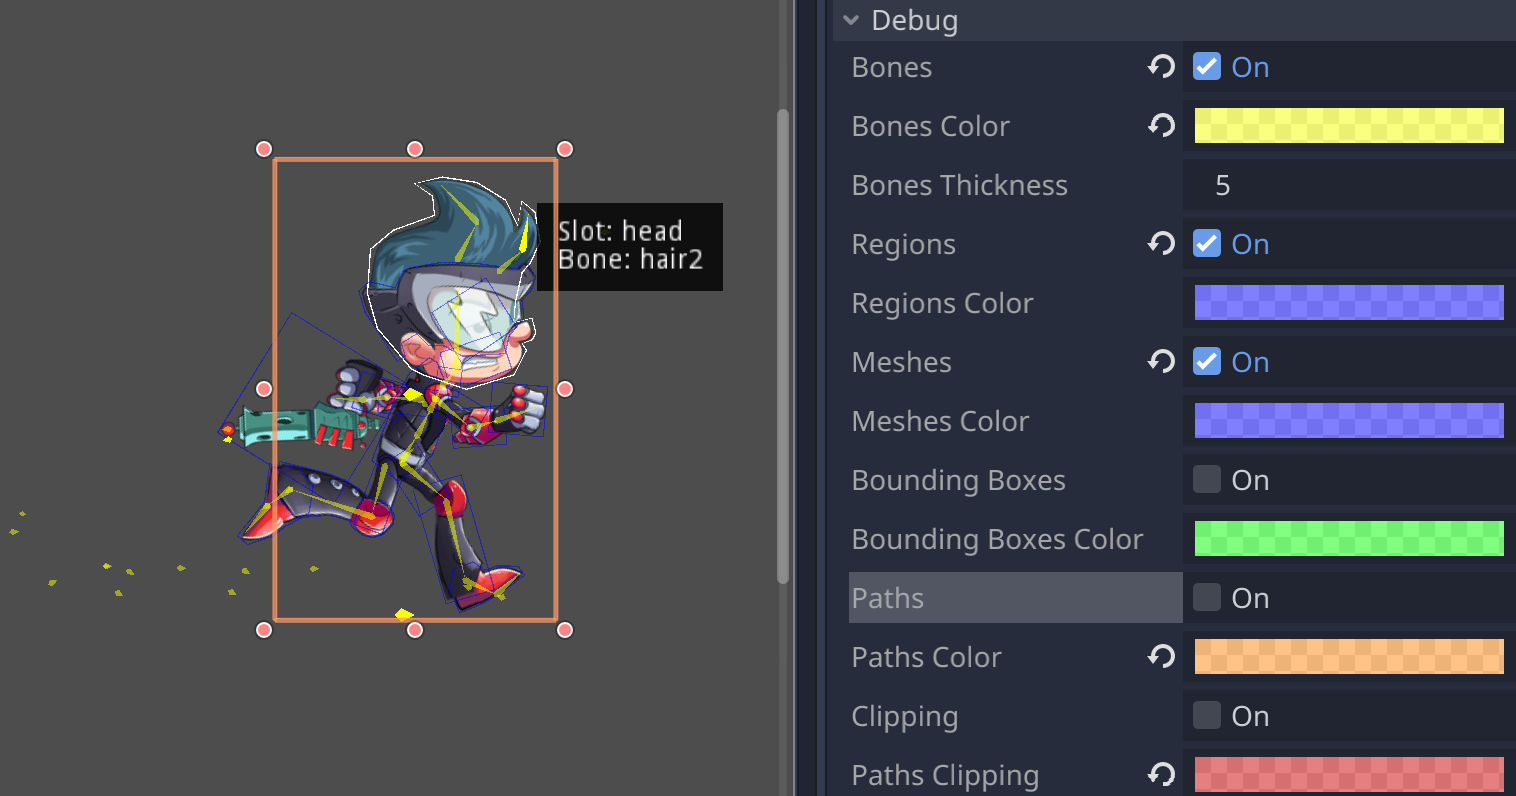
You can hover your mouse in the editor viewport over parts you are interested in to show their names.
Previewing animations
The Preview property section lets you set an animation to be played back right in the editor viewport.
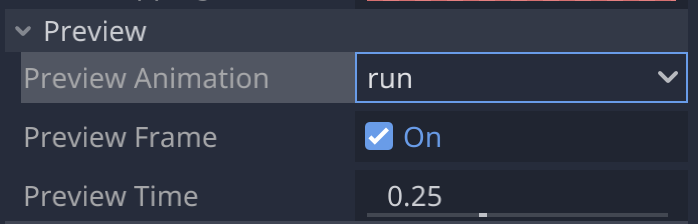
When Preview Frame is checked, the animation frame at the current Preview Time is displayed. You can scrub through the animation via the Preview Time slider.
Setting custom materials
The Materials property section lets you set a custom material for each supported Spine blend mode. The materials will be applied to all slots and their attachments in the SpineSprite.

You can use the SpineSlotNode to set materials for a single slot, which will ovewrite the custom materials set on the SpineSprite.
See the example/09-custom-material scene in the example project.
Setting the Update Mode
By default, a SpineSprite updates its underlying data as fast as possible, every frame. Changing this behaviour can be done via the Update Mode property.
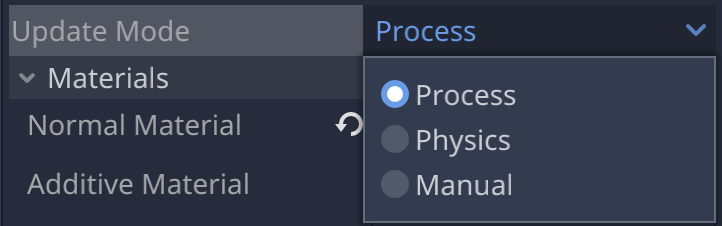
The Process mode is the default and is dependent on the frame rate. The Physics mode updates the SpineSprite in fixed intervals (60 times per second by default) and is useful for code related to the Godot physics engine. The Manual mode disables all automatic updates. When set, the SpineSprite needs to be updated manually when overriding _process(delta) or _physics_process(delta) by calling SpineSprite.update_skeleton(). This mode gives full control over when a SpineSprite is updated.
See Idle and Physics Processing in the official Godot documentation for more information.
Animating a SpineSprite
Animating a SpineSprite is done in code via GDScript or C#. Below, you'll find example code using GDScript which directly translates to the spine-godot C# API as well. See the Godot C# documentation on how the APIs are mapped from GDScript to C#.
The SpineSprite exposes a SpineAnimationState via get_animation_state(). See Applying Animations in the Spine Runtimes Guide for more in-depth information, specifically about animation tracks and animation queueing.
To set a specific animation on track 0 of a SpineSprite, call SpineAnimationState.set_animation():
func _ready():
var animation_state = get_animation_state()
animation_state.set_animation("walk", true, 0)
The first parameter is the name of the animation, the second parameter specifies whether to loop the animation, and the last parameter specifies the animation track the animation should be played back on.
Queuing animations is also done through the animation state methods:
func _ready():
var animation_state = get_animation_state()
animation_state.set_animation("idle", true, 0)
animation_state.add_animation("walk", 0.5, true, 0)
The first parameter to add_animation() is the animation name. The second parameter specifies the delay in seconds, after which this animation should replace the previous animation on the track. The third parameter specifies whether the animation should be looped. The final parameter specifies the track the animation should be played back on.
When setting or adding an animation to an animation state track, a SpineTrackEntry is returned, which allows to further modify the properties of this specific animation playback. For example, you can set the track entry to reverse the animation playback:
track_entry.set_reverse(true)
Note: Do not hold on to
SpineTrackEntryinstance outside the function you are using them in. Track entries are re-used internally and will thus become invalid once the animation it represents has been completed.
You can set or queue empty animations on an animation track to smoothly reset the skeleton back to the setup pose via the set_empty_animation() and add_empty_animation():
animation_state.add_empty_animation(0, 0.5, 0.5)
The first parameter to set_empty_animation() specifies the track. The second parameter specifies the mix duration in seconds used to mix out the previous animation and mix in the "empty" animation.
The first parameter to add_empty_animation() specifies the track. The second parameter specifies the mix duration in seconds used to mix out the previous animation and mix in the "empty" animation. The third parameter is the delay in seconds, after which the "empty" animation should replace the previous animation on the track via mixing.
All animations on a track can be cleared immediately via clear_track(track_id). To clear all tracks at once, clear_tracks() can be used. This will leave the skeleton in the last pose it was in.
To reset the pose of a skeleton to the setup pose, use SpineSprite.get_skeleton().set_to_setup_pose(). This will reset both bones and slots to their setup pose configuration. Use SpineSprite.get_skeleton().set_slots_to_setup_pose() to only reset the slots to their setup pose configuration.
Signals
A SpineSprite exposes multiple signals to react to events throughout its life-cycle.
To react to changes of the animation state, you can connect to these signals:
animation_started, emitted when an animation has started.animation_interrupted, emitted when the animation's track was cleared, or a new animation was set.animation_completed, emitted whenever an animation on a track completes a loop.animation_ended, emitted when the animation will never be applied again.animation_disposed, emitted when the animation track entry is disposed.animation_event, emitted when a user defined event happened.
In addition to animation state events, a SpineSprite also exposes signals for its higher-level life-cycle:
before_animation_state_update, emitted before the animation state is updated with the current delta time.before_animation_state_apply, emitted before the animation state is applied to the skeleton pose.before_world_transforms_change, emitted before the world transforms of the skeleton's bones are updated.world_transforms_changed, emitted after the world transforms of the skeleton's bones are updated.
These signals can come in handy when updating bones or other skeleton components manually. Generally, it is advised to use SpineBoneNode or SpineSlotNode instead, as they hide the intricacies of such manual updates, while covering 99% of the uses cases, like positioning a bone based on a mouse cursor position.
See example/02-animation-state-listeners scene in the example project.
Mix-and-match Skins

Many applications and games allow their users to create custom avatars out of many individual items, such as hair, eyes, pants, or accessories like earrings or bags. In Spine, this can be achieved by mixing and matching skins.
You can create custom skins from other skins as follows:
var data = get_skeleton().get_data()
custom_skin.add_skin(data.find_skin("skin-base"))
custom_skin.add_skin(data.find_skin("nose/short"))
custom_skin.add_skin(data.find_skin("eyelids/girly"))
custom_skin.add_skin(data.find_skin("eyes/violet"))
custom_skin.add_skin(data.find_skin("hair/brown"))
custom_skin.add_skin(data.find_skin("clothes/hoodie-orange"))
custom_skin.add_skin(data.find_skin("legs/pants-jeans"))
custom_skin.add_skin(data.find_skin("accessories/bag"))
custom_skin.add_skin(data.find_skin("accessories/hat-red-yellow"))
get_skeleton().set_skin(custom_skin)
get_skeleton().set_slots_to_setup_pose()
Create a custom skin via SpineSprite.new_skin(name). Next, fetch the SpineSkeletonData from the SpineSkeleton the SpineSprite manages. This is used to look up skins by name via SpineSkeletonData.find_skin(). Add all the skins you want to combine via SpineSkin.add_skin(). Finally, set the new skin on the skeleton via SpineSkeleton.set_skin().
See the example/03-mix-and-match scene in the example project.
Getting and setting bone transforms
A SpineSprite wraps a Spine runtime skeleton, which itself consists of bones, slots, attachments, and constraints. The skeleton manages the transforms of bones in a coordinate system relative to the skeleton's origin in the Spine Editor.
The SpineSprite class exposes the helper methods get_global_bone_transform(name) and set_global_bone_transform(name, transform) to let you get and set a bone's transform in the Godot canvas space. Note that a retrieved or set transform will not encode skew.
If you want to set the transform of a bone manually, you must do so before the SpineSprite updates the world transforms of the skeleton's bones. This can be done in reaction to the before_world_transforms_change signal.
An alternative to setting a bone's transform directly is to use a SpineBoneNode.
SpineBoneNode
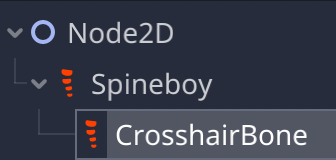 A
A SpineBoneNode can either follow a skeleton's bone, or drive its transform. Use a SpineBoneNode in drive mode in scenarios where you want to control the transform of a bone based on some input, e.g. the mouse position. Use a SpineBoneNode in follow mode if you want another node to follow a bone in a skeleton, e.g. to attach a CollisionShape to a bone of a SpineSprite.
To create a SpineBoneNode, right-click the SpineSprite you want to attach the node to, and select Add child node.... Select SpineBoneNode from the list of available node types and give it a name. You can then modify the node's configuration in the inspector.
Note: A
SpineBoneNodemust always be a direct child of aSpineSprite, otherwise it will be unable to locate the bone it should follow or drive.

The Bone Name property dropdown displays all available bones to select from. The Bone Mode specifies whether the node should follow a bone in the SpineSprite or drive it. The node can be enabled or disabled, allowing to turn following and driving on and off on demand.
The SpineBoneNode will also be displayed in the editor viewport. The properties in the Debug section define its appearance.
See the example/05-mouse-following scene for an example on how to use a SpineBoneNode to drive a bone inside a SpineSprite using mouse movement.
See the example/06-bone-following scene for an example on how to use a SpineBoneNode to follow a bone in a SpineSprite. In this example, the SpineBoneNode itself has a child, which will appear to follow the bone in the SpineSprite.
Note: The child node will not be properly inserted into the
SpineSpritedrawing order. TheSpineSlotNodeis better suited for use cases, where you want to insert arbitrary nodes into the drawing order of the parts making up aSpineSprite.
SpineSlotNode
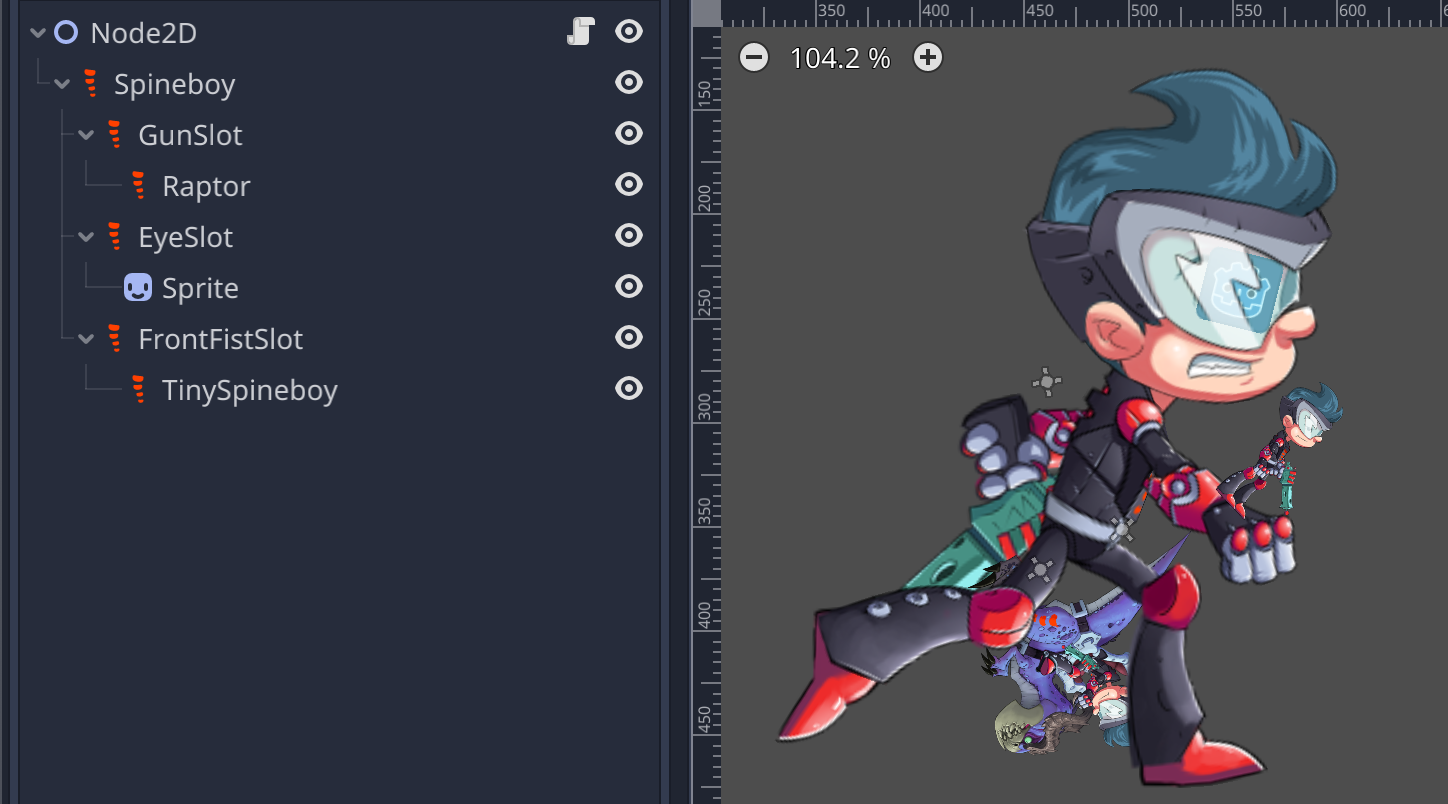
A SpineSlotNode lets you insert your own nodes into the drawing order of a SpineSprite. It can be used to attach particle system, custom sprites, or even other SpineSprite nodes to specific slots of the skeleton. The children of the SpineSlotNode will be rendered on top of any active attachment of the slot. You can also use a SpineSlotNode to override the materials of a specific slot.
To create a SpineSlotNode, right-click the SpineSprite you want to attach the node to, and select Add child node.... Select SpineSlotNode from the list of available node types and give it a name. You can then modify the node's configuration in the inspector.
Note: A
SpineSlotNodemust always be a direct child of aSpineSprite, otherwise it will be unable to locate the slot it is assigned to.
The Slot Name property dropdown displays all available slots to select from. The Materials section lets you set the materials that should be used to override the default materials of this slot.
See the example/07-slot-node scene for an example on how to use a SpineSlotNode to insert nodes into the drawing order of a SpineSprite.
See the example/09-custom-material scene for an example on how to use a SpineSlotNode to override the materials of a specific slot in a SpineSprite.
SpineAnimationTrack

Note:
SpineAnimationTrackis highly experimental due to Godot's animation engine not being open enough for 3rd party plugins to support the full fidelty as found in e.g. animation imported 3D characters. It is not available in the spine-godot GDExtension.
A SpineAnimationTrack node lets you animate a SpineSprite via Godot's animation player and powerful animation editor. It's ideally suited to create cut scenes using Godot's animation editor instead of handcrafting them by code.
To create a SpineAnimationTrack, right-click the SpineSprite you want to attach the node to, and select Add child node.... Select SpineAnimationTrack from the list of available node types and give it a name. You can then modify the node's configuration in the inspector.
Note: A
SpineAnimationTrackmust always be a direct child of aSpineSprite, otherwise it will be unable to locate the slot it is assigned to.
When creating a SpineAnimationTrack, an AnimationPlayer node is created and attached as a child.
A SpineSprite is then animated by keying both the SpineAnimationTrack and its child AnimationPlayer. You set the animation to be played back by keying the child AnimationPlayer. To modify animation properties, like whether it should be looped, played in reverse, and so on, you key the SpineAnimationTrack properties.
This two tiered setup allows the animation editor to display the duration of keyed animations of the child AnimationPlayer, which makes creating complex animation sequences a lot easier. It also allows scrubbing the timeline in the animation editor for previewing.
Note: Mix times defined in the
SpineSkeletonDataResourceused by aSpineSpritecan not be previewed in the editor due to technical limitations of the Godot animation editor.
You can attach multiple SpineAnimationTrack nodes to a single SpineSprite. This can be used to layer multiple animations on top of each other. Each SpineAnimationTrack is assigned a track index. Animations on higher tracks override effects of animations on lower tracks if they key the same skeleton property.
See the example/08-animation-player scene for an example. The AnimationPlayer attached to the root of the scene has two animations that key the SpineAnimationTrack nodes and their child AnimationPlayer nodes. The slow-moonwalk animation is a simple illustration of the basic principles of SpineAnimationTrack. The cutscene animation is a more elaborate animation, demonstrating multi-track keying and complex animation sequences.
2D Lighting
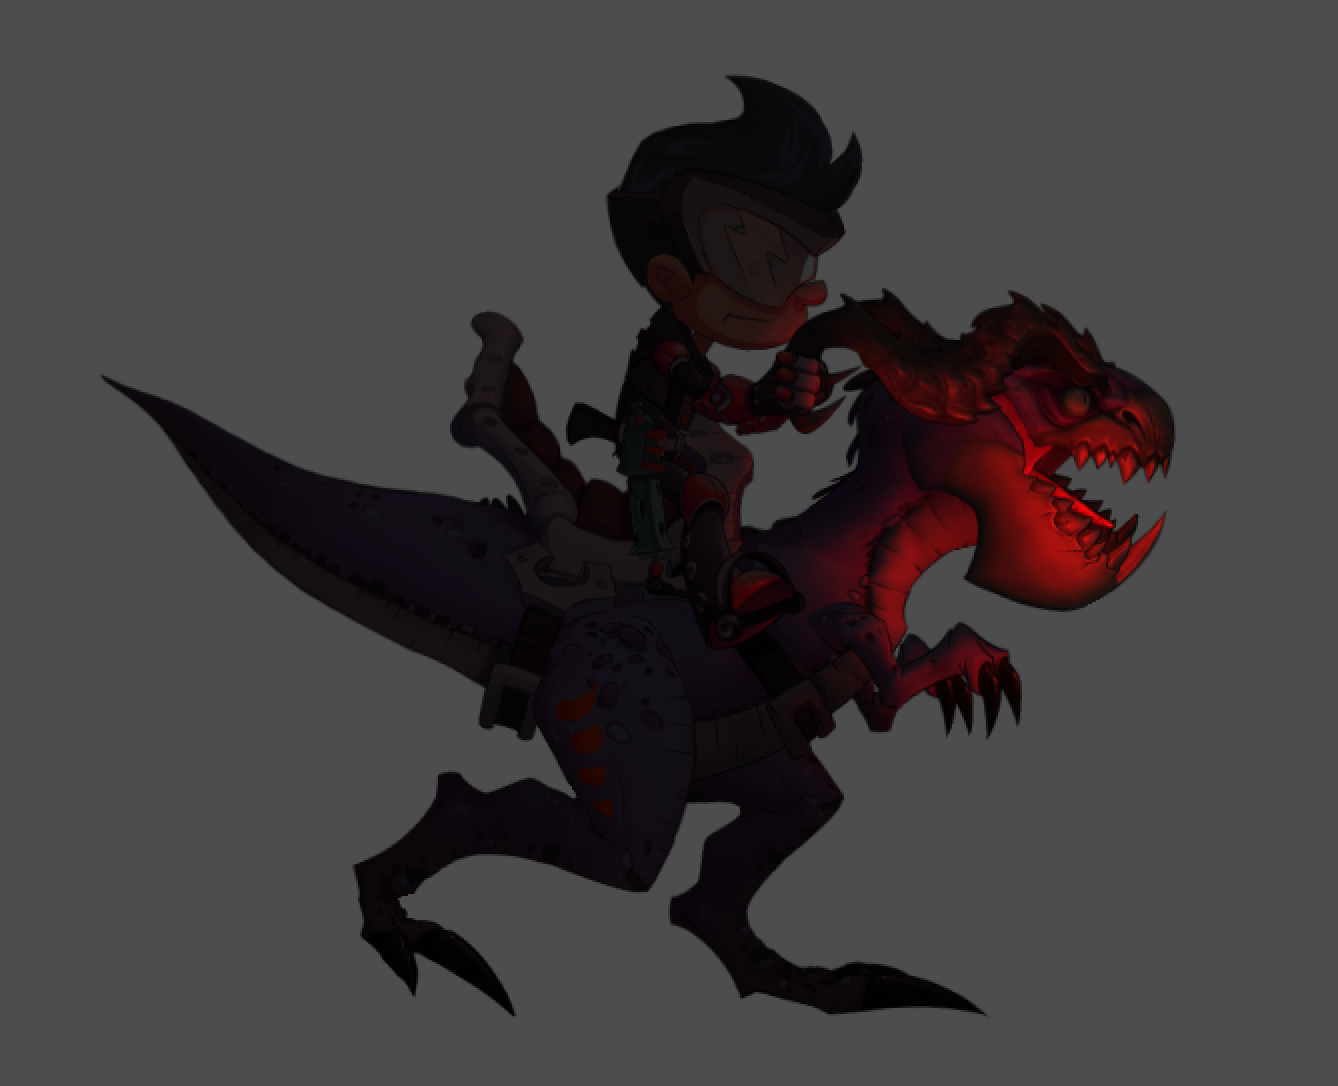
spine-godot integrates with Godot's 2D lighting system.
To support Godot's 2D lighting system, you must provide normal maps for your texture atlas. Each .png making up a texture atlas page must have a corresponding .png normal map image next to it in the file hierarchy. The normal map image files must have a common prefix. The default prefix is n_. E.g. a texture atlas page image called raptor.png must have a normal map image called n_raptor.png next to it.
Upon importing a texture atlas, spine-godot will try to locate and load normal map images for each texture atlas page image. You can define your own normal map image prefix in the texture atlas import view.
Once the texture atlas page and normal map images have been successfully imported, you can apply Godot's 2D lighting system to your SpineSprite nodes.
See the 10-2d-lighting scene in the examples.
Loading .skel/.json/.atlas files from disk
For modding purposes, it might be useful to be able to load export Spine assets from an arbitrary location on disk. You can achieve this by using the SpineSkeletonFileResource.load_from_file() function for .skel and .json skeleton files, and the SpineAtlasResource.load_from_atlas_file() function for .atlas files.
The general principle:
- Load the skeleton file
- Load the atlas file
- Construct a
SpineSkeletonDataResourcefrom the skeleton and atlas - Create one or more
SpineSpriteinstances from theSpineSkeletonDataResource. The data resource is shared!
The whole process in GDScript:
var skeleton_file_res = SpineSkeletonFileResource.new();
skeleton_file_res.load_from_file("/Users/badlogic/workspaces/spine-runtimes/examples/coin/export/coin-pro.skel");
# Load the atlas file
var atlas_res = SpineAtlasResource.new();
atlas_res.load_from_atlas_file("/Users/badlogic/workspaces/spine-runtimes/examples/coin/export/coin.atlas");
# Create a skeleton data resource, you can share this across multiple sprites
var skeleton_data_res = SpineSkeletonDataResource.new();
skeleton_data_res.skeleton_file_res = skeleton_file_res;
skeleton_data_res.atlas_res = atlas_res
# Create a sprite from the skeleton data and add it as a child
var sprite = SpineSprite.new();
sprite.skeleton_data_res = skeleton_data_res;
sprite.position.x = 200;
sprite.position.y = 200;
sprite.get_animation_state().set_animation("animation", true, 0);
self.add_child(sprite)
See also the 13-load-from-disk example.
Spine Runtimes API access
spine-godot maps almost all of the Spine Runtime API to GDSCript. Objects returned by SpineSprite, like SpineSkeleton via SpineSprite.get_skeleton() are 1:1 translations of the spine-cpp API to GDScript. You can thus apply almost all of the materials in the generic Spine Runtimes Guide to your GDScripts.
Due to the nature of GDScript, there are however a few limitations:
- Any returned array or map is a copy of the internal array. Modification will not have an effect.
- You can not set listeners on individual
SpineTrackEntryobjects. Setup signals onSpineSpriteinstead. - You can not create, add or remove bones, slots, and other Spine objects directly.
- The C++ class hierarchies of attachments and timelines are not exposed in GDScript.