
spine-phaser Runtime Documentation
Licensing
Please see the Spine Runtimes License before integrating the Spine Runtimes into your applications.
Getting Started
This is a unified page for our official Phaser runtimes. Here you can find a list of our official Phaser runtimes along with the respective compatible versions:
| Runtime | Phaser version | Maintained |
|---|---|---|
| spine-phaser-v4 | Runtime >= 4.3.11: Phaser >= 4.2.1 Runtime < 4.3.11: Phaser>= 4.1.0 | Yes |
| spine-phaser-v3 | 3 (minimum 3.60.0) | Yes |
| spine-phaser | 3 (minimum 3.60.0) | No (switch to spine-phaser-v3) |
Unless otherwise indicated, the examples and GitHub file links refer to the v4 version. Shared runtime concepts also apply to v3 by replacing -v4 with -v3 in paths and links. Sections about Phaser 4.2.1, Mesh2D, renderer backends, and slot objects apply only to spine-phaser-v4 4.3.11 and newer.
The spine-phaser runtime is implemented on top of spine-ts core, a TypeScript implementation of the renderer-agnostic Spine Runtimes core APIs. The spine-phaser runtime supports all platforms supported by Phaser 3 and 4, including rendering via the Canvas APIs as well as rendering via WebGL.
spine-phaser-v4 4.3.11 and newer require Phaser 4.2.1 or newer. Earlier runtime versions require Phaser 4.1.0 or newer. spine-phaser-v4 supports all Spine features in WebGL games. In Canvas games it does not support meshes, tint black, blend modes, or slot objects.
Installation
To use spine-phaser in your Phaser project, you must first include its sources. The examples below use spine-phaser-v4. For spine-phaser-v3, use Phaser 3.60.0 or newer and replace spine-phaser-v4 with spine-phaser-v3 in package names, imports, and script paths.
Vanilla JavaScript
In vanilla JavaScript, use a script tag to include the spine-phaser runtime from unpkg:
<script src="https://unpkg.com/@esotericsoftware/spine-phaser-v4@4.3.*/dist/iife/spine-phaser-v4.js"></script>
Note: Ensure that the
major.minorversion of spine-phaser matches themajor.minorSpine Editor version you are exporting from. See Synchronizing versions for more information.
Next, add the Spine scene plugin to your Phaser game configuration:
...
plugins: {
scene: [
{ key: "spine.SpinePlugin", plugin: spine.SpinePlugin, mapping: "spine" }
]
}
}
new Phaser.Game(config);
All scenes in your project can now use the spine-phaser runtime.
Check out basic-vanilla-js-example.html for a full example.
The spine-phaser package also provides source maps for debugging, as well as minified versions of spine-phaser, which can be used by replacing the .js file suffix with .min.js in the unpkg URLs.
For local vendoring, you can build spine-phaser.js by following the instructions in the spine-ts README.md.
NPM or Yarn
When using NPM or Yarn for dependency management, add spine-phaser the usual way:
Note: Ensure that the
major.minorversion of spine-phaser matches themajor.minorSpine Editor version you are exporting from. See Synchronizing versions for more information.
Next, add the Spine scene plugin to your Phaser game configuration:
import {SpinePlugin} from "@esotericsoftware/spine-phaser-v4"
const config = {
...
plugins: {
scene: [
{ key: "spine.SpinePlugin", plugin: SpinePlugin, mapping: "spine" }
]
}
}
new Phaser.Game(config);
All scenes in your project can now use the spine-phaser runtime.
Check out the spine-phaser esbuild/TypeScript project for minimal example.
Our module packages also contain source maps as well as d.ts typings for improved debugging and development.
Samples
The spine-phaser runtime includes several samples demonstrating its feature set.
To run the examples locally:
- Install Git and Node.js for your operating system.
- Clone the spine-runtimes repository:
git clone https://github.com/esotericsoftware/spine-runtimes - At the terminal, navigate to
spine-runtimes/spine-ts, then runnpm install & npm run dev.
This builds the spine-phaser runtime, then opens a browser, displaying the example index for all spine-ts based runtimes.
Click on the spine-phaser example you are interested in, and check out the code in the spine-runtimes/spine-ts/spine-phaser-v4/example folder.
Updating the spine-phaser Runtime
Before updating your project's spine-phaser runtime, please consult our guide on Spine editor and runtime version management.
To update the spine-phaser runtime in vanilla JavaScript, change the version string in the src attribute or the script tag fetching spine-phaser from unpkg.
To update the spine-phaser runtime when managing dependencies with NPM or Yarn, change the version string in your package.json file.
Note: If you change the
major.minorversion of the spine-phaser package, you have to re-export your Spine skeletons with the same Spine Editormajor.minorversion! See Synchronizing versions for more information.
Using spine-phaser
The spine-phaser runtime supports all Spine features when using WebGL. Canvas rendering has the limitations described in Getting Started.
Renderer Backends
spine-phaser-v4 supports three renderer backends. In WebGL games, renderer: "phaser" is the default. It renders Spine attachments through Phaser's Mesh2D API, allowing them to participate in Phaser's rendering and batching. This is also the only backend that supports attaching Phaser game objects to Spine slots.
Use renderer: "spine-webgl" to render a SpineGameObject with the spine-webgl renderer used by previous versions:
renderer: "spine-webgl"
});
The renderer is selected per SpineGameObject when it is created and cannot be changed afterward. Slot-object APIs are not supported by the "spine-webgl" backend. The shared spine-webgl SceneRenderer is available through SpinePlugin.webGLRenderer.
Phaser Canvas games automatically use renderer: "spine-canvas". This is the only backend supported in Canvas games and can also be selected explicitly. It does not support meshes, tint black, blend modes, or slot objects.
Asset Management
Exporting for spine-phaser
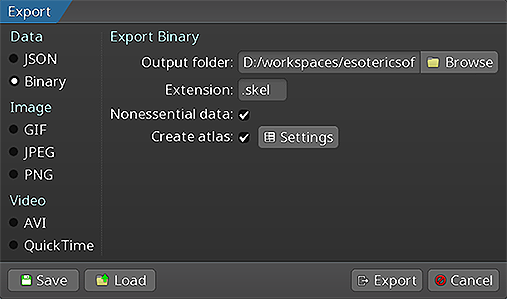
Follow the instructions in the Spine User Guide on how to:
An export of the skeleton data and texture atlas of your skeleton will yield the following files:
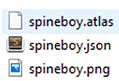
skeleton-name.jsonorskeleton-name.skel, containing your skeleton and animation data, either in the JSON or binary format.skeleton-name.atlas, containing information about the texture atlas.- One or more
.pngfiles, each representing one page of your texture atlas containing the packed images your skeleton uses.
Note: You should prefer binary skeleton exports over JSON exports, as they are smaller in size and faster to load.
When serving these files, make sure the server emits the correct MIME types.
Updating Spine Assets
During development, you may frequently update your Spine skeleton data and texture atlas files. You can simply overwrite these source files (.json, .skel, .atlas, .png) by re-exporting from the Spine Editor and replacing the existing files in your Phaser project.
Ensure that the major.minor version of spine-phaser matches the major.minor Spine Editor version you are exporting from. See Synchronizing versions for more information.
Core classes
The spine-phaser API is built on top of the generic TypeScript spine-core runtime, which provides platform independent core classes and algorithms to load, query, modify, and animate Spine skeletons.
Here, we will briefly discuss the most important core classes that you will encounter in your day-to-day use of spine-phaser. Please consult the Spine Runtimes Guide for a detailed overview of the Spine Runtimes architecture, core classes, and API usage.
The TextureAtlas class stores the data loaded from an .atlas file and its corresponding .png image files.
The SkeletonData class stores the data loaded from a .json or .skel skeleton file. The skeleton data contains information about the bone hierarchy, slots, attachments, constraints, skins, and animations. A SkeletonData instance is usually loaded by also providing an Atlas from which it sources the images to be used by the skeleton it represents. It serves as a blueprint for creating Skeleton instances. Multiple skeletons can be instantiated from the same atlas and skeleton data, which then share the loaded data, minimizing both load times and memory consumption at runtime.
The Skeleton class stores an instance of a skeleton, created from a SkeletonData instance. A skeleton stores its current pose, that is the position of bones and the current configuration of slots, attachments, and active skin. The current pose can be computed by either manually modifying the bone transforms, or, more commonly, by applying animations via an AnimationState.
The AnimationState class is responsible for keeping track of which animation(s) should be applied to a skeleton, advancing and mixing those animations based on the elapsed time between the last and current rendering frame, and applying the animations to a skeleton instance, thereby setting its current pose. The AnimationState queries an AnimationStateData instance to retrieve mixing times between animations, or fetches the default mix time if no mixing time is available for a pair of animations.
The spine-phaser runtime builds on top of these core classes.
Spine Scene Plugin
The spine-phaser scene plugin adds functionality to (pre-)load exported .json, .skel, and .atlas files to a scene's LoaderPlugin (Scene.load). It provides getters to access the raw skeleton data and texture atlases.
The scene plugin extends the scene's GameObjectFactory (Scene.add) and GameObjectCreator (Scene.make) with functions to create SpineGameObject instances from loaded skeleton data and atlas files.
Loading Spine Assets
Spine assets, like skeleton data .json/.skel files, or .atlas files, are loaded through additional functions added to the LoaderPlugin (Scene.load) of a Phaser Scene by the SpinePlugin.
spineSkeleton(key: string, url: string, options?: SpineSkeletonFileOptions): loads a.jsonor.skelskeleton data file from theurland makes it available via thekey. The file format is normally determined from the URL extension. If the URL does not have a usable extension, setoptions.formatto"json"or"binary". Setoptions.xhrSettingsto customize the request.spineAtlas(key: string, url: string, options?: SpineAtlasFileOptions): loads a texture atlas.atlasfile and its related.pngtexture atlas page files from theurland makes it available via thekey. Premultiplied alpha is read from the.atlasfile. Setoptions.xhrSettingsto customize the request.
Assuming you have exported your skeleton data to a binary skeleton file called skeleton.skel, and your atlas to a file called skeleton.atlas with one corresponding skeleton.png file, you can load your assets in your scene's preload() function like this:
this.load.spineSkeleton("skeleton-data", "path/to/skeleton.skel");
this.load.spineAtlas("skeleton-atlas", "path/to/skeleton.atlas");
}
When the skeleton data URL path does not end in .json or .skel, specify its format explicitly:
format: "binary"
});
The preload() function loads the SkeletonData from the skeleton.skel file and caches it under the key skeleton-data. It also loads the TextureAtlas from the skeleton.atlas file, as well as a texture from the corresponding skeleton.png file. The atlas is cached under the key skeleton-atlas. The individual texture atlas page images are loaded transparently without the need for explicitly loading them.
Once preloading has finished, you can access the TextureAtlas via Scene.spine.getAtlas(atlasKey). Similarly, you can access the raw SkeletonData via Scene.spine.getSkeletonData(dataKey, atlasKey). Note the second parameter: a SkeletonData instance can only be created in combination with an atlas for that skeleton data.
The skeleton data and atlas on their own can not be animated or rendered. Instead, a SpineGameObject is constructed from them. SpineGameObject instances can share the same skeleton data and atlas.
Creating SpineGameObject instances
Once skeleton data and a corresponding atlas have been loaded, a SpineGameObject can be created and optionally be added to the current scene via the spine() functions added to the scene's GameObjectFactory (Scene.add) and GameObjectCreator (Scene.make) by the SpinePlugin. You can use them in your scene's create() function:
// Create a SpineGameObject through the GameObjectFactory and add it to the scene
const spineObject = this.add.spine(400, 500, "skeleton-data", "skeleton-atlas");
// Create a SpineGameObject through the GameObjectCreator. It is not automatically
// added to the scene.
const spineObject2 = this.make.spine({
x: 200, y: 500,
dataKey: "skeleton-data", atlasKey: "skeleton-atlas"
});
// Manually add the game object to the scene
this.add.existing(spineObject2);
}
The spine() function on the GameObjectFactory takes the object's position, the key of the skeleton data, and the key of the atlas. This function automatically adds the object to the scene. An optional fifth-argument options object specifies the bounds provider and, in spine-phaser-v4, the renderer backend:
boundsProvider: new spine.SkinsAndAnimationBoundsProvider("walk")
});
Calling this.make.spine(config) creates and returns a SpineGameObject without adding it to the scene. Add it later with this.add.existing(spineObject), or pass true as the second argument (this.make.spine(config, true)) to add it immediately. The SpineGameObjectConfig supports the position, data key, atlas key, and bounds provider. The spine-phaser-v4 configuration also supports the renderer backend.
A SpineGameObject can also be constructed directly with the same options-object API in both runtimes, then added to the scene manually:
x: 400,
y: 500,
dataKey: "skeleton-data",
atlasKey: "skeleton-atlas"
});
this.add.existing(spineObject);
By default, a SpineGameObject is sized based on its setup pose bounding box. Customize this behavior with the boundsProvider property of the fifth-argument options object.
A bounds provider calculates the size of the bounding box of a Spine game object. By default, a SetupPoseBoundsProvider is used, which calculates the bounding box based on the bounds of the skeleton in its setup pose.
Another bounds provider is the SkinsAndAnimationBoundsProvider, which calculates the bounding box based on the maximum bounding box for a given set of skins and animation.
You can also provide a custom bounds provider by implementing the SpineGameObjectBoundsProvider interface.
SpineGameObject
A SpineGameObject is a Phaser GameObject that bundles storing, updating, and rendering a Skeleton and its associated AnimationState. SpineGameObject instances are created from a skeleton data and an atlas, as described in the last section. The Skeleton and AnimationState are accessible through the skeleton and animationState fields respectively.
Every frame, the SpineGameObject will:
- Update the
AnimationState - Apply the
AnimationStateto theSkeleton - Update the
Skeletonworld transforms, resulting in a new pose - Render the
Skeletonin its current pose
Applying Animations
Applying animations to a skeleton displayed by a SpineGameObject is done through the AnimationState.
Note: See Applying Animations in the Spine Runtimes Guide for more in-depth information, specifically about animation tracks and animation queueing.
To set a specific animation on track 0, call AnimationState.setAnimation():
The first parameter specifies the track, the second parameter is the name of the animation, and the third parameter defines whether to loop the animation.
You can queue multiple animations:
spineObject.animationState.addAnimation(0, "jump", 2, false);
spineObject.animationState.addAnimation(0, "run", 0, true);
The first parameter to addAnimation() is the track. The second parameter is the name of the animation. The third parameter specifies the delay in seconds, after which this animation should replace the previous animation on the track. The final parameter defines whether to loop the animation.
In the example above, the "walk" animation is played back first. 2 seconds later, the "jump" animation is played back once, followed by a transition to the "run" animation, which will be looped.
When transitioning from one animation to another, AnimationState will mix the animations for a specific duration called mix time. These mix times are defined in an AnimationStateData instance, from which the AnimationState retrieves mix times.
The AnimationStateData instance is also available through the SpineGameObject. You can set the default mix time, or the mix time for a specific pair of animations:
spineObject.animationStateData.setMix("walk", "jump", 0.1);
When setting or adding an animation, a TrackEntry object is returned, which allows further modification of that animation's playback. For example, you can set the track entry to reverse the animation playback:
entry.reverse = true;
See the TrackEntry class documentation for more options.
Note: Be careful about holding on to
TrackEntryinstances outside the function you are using them in. Track entries are re-used internally and will thus become invalid once the track entry dispose event occurs.
You can set or queue empty animations on an animation track to smoothly reset the skeleton back to its setup pose:
spineObject.animationState.addEmptyAnimation(0, 0.5, 0.5);
The first parameter to setEmptyAnimation() specifies the track. The second parameter specifies the mix duration in seconds used to mix out the previous animation and mix in the "empty" animation.
The first parameter to addEmptyAnimation() specifies the track. The second parameter specifies the mix duration. The third parameter is the delay in seconds, after which the empty animation should replace the previous animation on the track via mixing.
All animations on a track can be cleared immediately via AnimationState.clearTrack(). To clear all tracks at once, AnimationState.clearTracks() can be used. This will leave the skeleton in the last pose it was in.
To reset the pose of a skeleton to the setup pose, use Skeleton.setupPose():
This will reset both the bones and slots to their setup pose configuration. Use Skeleton.setupPoseSlots() to only reset the slots to their setup pose configuration.
Inheriting Game Object Movement in Skeleton Physics
By default, moving or rotating a SpineGameObject does not pass that movement to the skeleton's physics constraints. Use the skeletonPhysics property to enable position or rotation inheritance:
spineObject.skeletonPhysics.rotationInheritance = 1;
Position and rotation inheritance default to 0. A value of 1 applies the full movement, while values between 0 and 1 apply a fraction of it. Set the values back to 0 to disable inheritance. This API is the same in spine-phaser-v3 and spine-phaser-v4.
AnimationState Events
An AnimationState emits events during the life-cycle of an animation that is being played back. You can listen for this events to react as needed. The Spine Runtimes API defines the following event types:
start: emitted when an animation is started.interrupt: emitted when an animation's track was cleared, or a new animation was set.end: emitted when an animation will never be applied again.dispose: emitted when the animation's track entry is disposed.complete: emitted when an animation completes a loop.event: emitted when a user defined event happened.
To receive events, you can register an AnimationStateListener callback with either the AnimationState to receive events across all animations, or with the TrackEntry of a specific animation queued for playback:
start: (entry) => log(`Started animation ${entry.animation.name}`),
interrupt: (entry) => log(`Interrupted animation ${entry.animation.name}`),
end: (entry) => log(`Ended animation ${entry.animation.name}`),
dispose: (entry) => log(`Disposed animation ${entry.animation.name}`),
complete: (entry) => log(`Completed animation ${entry.animation.name}`),
event: (entry, event) => log(`Custom event for ${entry.animation.name}: ${event.data.name}`)
})
trackEntry.listener = {
event: (entry, event) => log(`Custom event for ${entry.animation.name}: ${event.data.name}`)
}
See the events-example.html example.
Skins
Many applications and games allow users to create custom avatars out of many individual items, such as hair, eyes, pants, or accessories like earrings or bags. With Spine, this can be achived by mixing and matching skins.
You can create custom skins from other skins like this:
const skin = new spine.Skin("custom");
skin.addSkin(skeletonData.findSkin("skin-base"));
skin.addSkin(skeletonData.findSkin("nose/short"));
skin.addSkin(skeletonData.findSkin("eyelids/girly"));
skin.addSkin(skeletonData.findSkin("eyes/violet"));
skin.addSkin(skeletonData.findSkin("hair/brown"));
skin.addSkin(skeletonData.findSkin("clothes/hoodie-orange"));
skin.addSkin(skeletonData.findSkin("legs/pants-jeans"));
skin.addSkin(skeletonData.findSkin("accessories/bag"));
skin.addSkin(skeletonData.findSkin("accessories/hat-red-yellow"));
spineObject.skeleton.setSkin(skin);
spineObject.skeleton.setupPoseSlots();
Create a custom skin with the Skin() constructor.
Next, fetch the SkeletonData from the skeleton. It is used to look up skins by name via SkeletonData.findSkin().
Add all the skins you want to combine into the new custom skin via Skin.addSkin().
Finally, set the new skin on the Skeleton and call Skeleton.setupPoseSlots() to ensure no attachments from previous skins and/or animations are left over.
See mix-and-match-example.html for full example code.
Setting Bone Transforms
When authoring a skeleton in the Spine Editor, the skeleton is defined in what is called the skeleton's world coordinate system or "skeleton coordinate system". This coordinate system may not align with the coordinate system of Phaser. Mouse and touch coordinates relative to the SpineGameObject need thus be converted to the skeleton coordinate system, e.g. if a user should be able to move a bone by touch.
The SpineGameObject method gameToBone(point: { x: number, y: number }, bone: Bone) converts a point in Phaser game coordinates to the local coordinate system of the specified bone. Use gameToSkeleton(point) to convert a point to the skeleton coordinate system without converting it to a bone's local coordinates.
The reverse conversion, from the skeleton coordinate system to Phaser game coordinates, can be achieved via SpineGameObject.skeletonToGame(point). All three coordinate conversion methods modify the supplied point in place.
See control-bones-example.html for full example code.
Adding Phaser Game Objects to Slots
When using the default renderer: "phaser" backend in a WebGL game, a SpineGameObject can render Phaser game objects at Spine slots. This is useful for attaching sprites, text, effects, or a Phaser.GameObjects.Container containing multiple game objects.
slotRef: number | string | Slot,
gameObject: Phaser.GameObjects.GameObject,
options?: SpineSlotObjectOptions
): void
The slot can be referenced by name, index, or Slot instance:
spineObject.addSlotObject("gun", label);
Only one game object can be attached to a slot at a time, and a game object can only be attached to one slot. Adding another game object to the same slot replaces the previous one. The game object is removed from its parent container and from the scene display list, then rendered by the SpineGameObject at the correct position in the skeleton draw order.
By default, the game object's local x and y are reset to 0, positioning it at the slot's bone. Use a Phaser.GameObjects.Container when you need to attach multiple game objects or control their local position, rotation, or scale as a group.
The options are:
followAttachmentTimeline(defaultfalse): whentrue, the game object is rendered only while the slot has an attachment.placement(default"after"): controls whether the game object is rendered before or after the slot attachment.clipping(defaulttrue): whentrue, active Spine clipping attachments also clip the game object.preservePosition(defaultfalse): whentrue, the game object's currentxandyare kept as a local offset instead of being reset to0.
placement: "after",
clipping: false,
preservePosition: true
});
Use the following methods to retrieve or detach slot objects:
removeSlotObject(slotRef: number | string | Slot, gameObject?: Phaser.GameObjects.GameObject): void
removeSlotObjects(): void
If gameObject is passed to removeSlotObject, it is removed only if it is the object currently attached to that slot. Removing a slot object detaches it but does not destroy it or add it back to the display list. Your application remains responsible for its lifecycle.
Slot objects follow the slot bone transform, including scale, rotation, and shear inherited from ancestor bones. During rendering, their alpha is multiplied by the SpineGameObject alpha, and their scroll factor is controlled by the SpineGameObject so they remain anchored to the slot. Removing a slot object does not restore its previous scroll factor.
Slot-object APIs are only supported by renderer: "phaser". Calling them on a SpineGameObject using renderer: "spine-webgl" or renderer: "spine-canvas" throws an error.
See slot-objects.html, slot-objects-alpha-scroll.html, and slot-objects-scale-rotation.html for full examples.
Spine Runtimes API access
spine-phaser exposes the entire spine-ts core API via the SpineGameObject properties skeleton, animationStateData, and animationState. See the JS doc documentation of these classes as well as the generic Spine Runtimes Guide.
Migrating from Phaser's former Spine Plugin
Older Phaser 3 releases included a separate Spine Plugin. When migrating to spine-phaser:
- Load skeleton data and atlases separately using
spineSkeleton()andspineAtlas(). - Pass both the skeleton data key and atlas key to
this.add.spine(). - Remove
SpineContainer; spine-phaser automatically batches compatibleSpineGameObjectinstances.